
FCMとは
FCM は、Firebaseが提供するメッセージを無料で確実に送信するためのクロスプラットフォーム メッセージング ソリューションです。
iPhone や Android などスマートフォンへの通知はもちろん、Chrome / Firefox / Edge / Firefox などブラウザへの通知も無料で送信が可能となっています。(SSLは必須)
今回は、ブラウザへ通知するサンプルをReact.jsで作成しながらFCMの仕組みについて学習してみました。
デモ
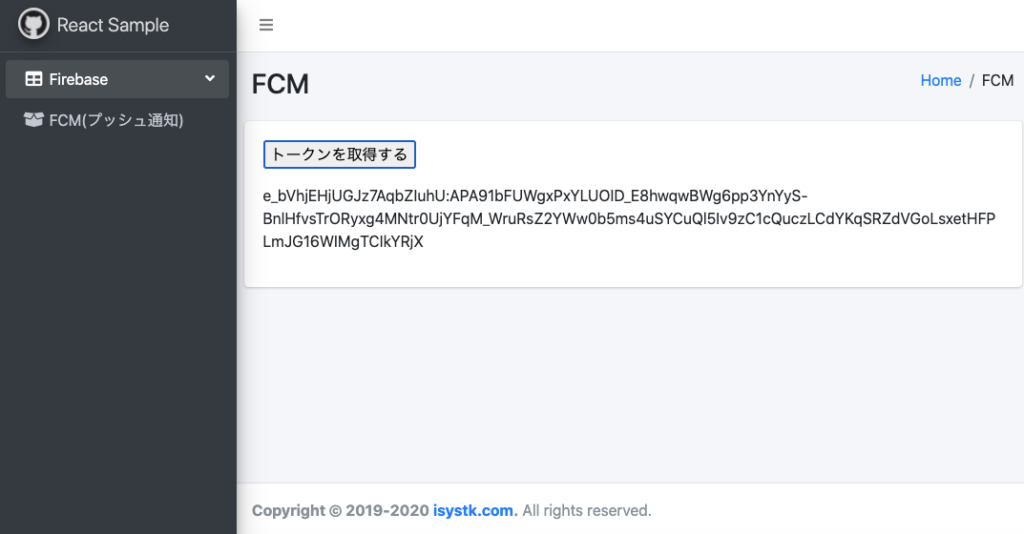
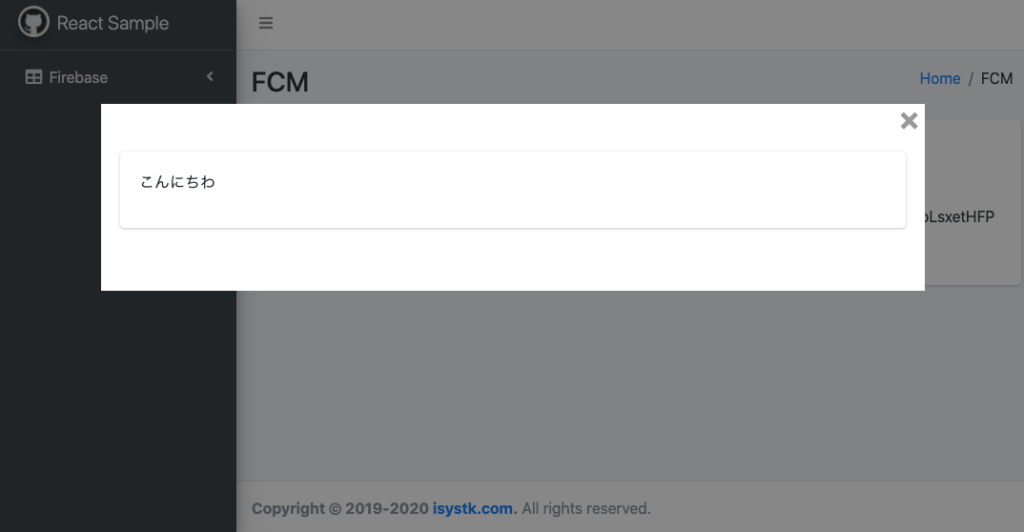
「トークンを取得」ボタンを押すとFCMトークンが表示されます。表示されたトークン宛にCurlでメッセージを送信するとブラウザ側で受信したメッセージが表示されます。
必要なモジュールを追加する
$ yarn add -D firebase
FCMトークンを表示するコンポーネント
import React, { FC, useState } from 'react'
import { useDispatch } from 'react-redux'
import firebase from 'firebase'

const Fcm: FC = () => {
  const dispatch = useDispatch()
  const [token, setToken] = useState('')
  const [notification, setNotification] = useState({ body: '' })

  if (!firebase.apps.length) {
    const firebaseConfig = {
      apiKey: 'xxxxxxxxxxx',
      authDomain: 'xxxxxxxxxxx.firebaseapp.com',
      projectId: 'xxxxxxxxxxx',
      storageBucket: 'xxxxxxxxxxx.appspot.com',
      messagingSenderId: 'xxxxxxxxxxx',
      appId: 'xxxxxxxxxxx',
      measurementId: 'xxxxxxxxxxx',
    }
    firebase.initializeApp(firebaseConfig)
    firebase.analytics()
  }

  // メッセージング オブジェクトの取得
  const messaging = firebase.messaging()

  // プッシュ通知を受信した場合
  messaging.onMessage(payload => {
    console.log('Message received. ', payload)
  })

  const YOUR_PUBLIC_VAPID_KEY_HERE =
    'xxxxxxxxxxx'

  // アプリにウェブ認証情報を設定する
  messaging.getToken({ vapidKey: YOUR_PUBLIC_VAPID_KEY_HERE })

  const getToken = () =>
    messaging
      .getToken({ vapidKey: YOUR_PUBLIC_VAPID_KEY_HERE })
      .then(currentToken => {
        if (currentToken) {
          console.log('Success!!', currentToken)
          setToken(currentToken)
        } else {
          console.log('No registration token available. Request permission to generate one.')
          // ...
        }
      })
      .catch(err => {
        console.log('An error occurred while retrieving token. ', err)
        // ...
      })

  return (
    <>
          <div>
            <p>
              <input type="button" value="トークンを取得する" onClick={getToken} />
            </p>
            <p>{token}</p>
          </div>
    </>
  )
}

export default Fcm
CurlでFCMトークン宛にメッセージを送信する
$ curl -X POST \
--header "Authorization: key={サーバーキー}" \
--header "project_id: key={送信者ID}" \
--header Content-Type:"application/json" \
https://fcm.googleapis.com/fcm/send \
-d @- << EOF
{
    "to": "トピック or registration_token",
    "notification": {
        "body": ""
    },
}
EOF
サンプルコード
https://github.com/isystk/react-fcm
ディレクトリ構造
.
├── docker (各種Daemon)
│   │
│   └── apache (Webサーバー)
│       ├── conf.d (apacheの設定ファイル)
│       └── logs (apacheのログ)
│
├── htdocs (Apache公開ディレクトリ)
│   │
│   ├── public
│   ├── src
│   │   ├── sass
│   │   └── ts
│   ├── package.json
│   ├── tsconfig.json
│   └── webpack.mix.js
└── dc.sh (Dockerの起動用スクリプト)
Docker 操作用シェルスクリプトの使い方
Usage:
  dc.sh [command] [<options>]

Options:
  stats|st                 Dockerコンテナの状態を表示します。
  init                     Dockerコンテナ・イメージ・生成ファイルの状態を初期化します。
  start                    すべてのDaemonを起動します。
  stop                     すべてのDaemonを停止します。
  apache restart           Apacheを再起動します。
  --version, -v     バージョンを表示します。
  --help, -h        ヘルプを表示します。
使い方
# 下準備
$ ./dc.sh init

# サーバーを起動する
$ ./dc.sh start

# フロントエンドをビルドする。
$ cd htdocs
$ yarn && yarn run dev

# ブラウザでアクセス(ChromeはServiceWorkerがオレオレ証明書では動作しないので、オプションを付きで起動しています)
$ open -a /Applications/Google\ Chrome.app/Contents/MacOS/Google\ Chrome --args \
--unsafely-treat-insecure-origin-as-secure=https://localhost \
--allow-insecure-localhost \
--ignore-certificate-errors

# Curlで、プッシュ通知を送信します。
curl -X POST \
--header "Authorization: key={サーバーキー}" \
--header "project_id: key={送信者ID}" \
--header Content-Type:"application/json" \
https://fcm.googleapis.com/fcm/send \
-d @- << EOF
{
    "to": "トピック or registration_token",
    "notification": {
        "body": ""
    },
}
EOF

# サーバーを停止する場合
$ ./dc.sh stop
関連記事


Warning: Undefined variable $aria_req in /home/r2383233/public_html/blog.isystk.com/wp-content/themes/isystk-blog-blue/comments.php on line 21
Warning: Undefined variable $html5 in /home/r2383233/public_html/blog.isystk.com/wp-content/themes/isystk-blog-blue/comments.php on line 24
Warning: Undefined variable $aria_req in /home/r2383233/public_html/blog.isystk.com/wp-content/themes/isystk-blog-blue/comments.php on line 24
Warning: Undefined variable $aria_req in /home/r2383233/public_html/blog.isystk.com/wp-content/themes/isystk-blog-blue/comments.php on line 27